Your cart is currently empty!
Forum
Release 5.2 of the ASIIE App.
Quote from Naji on March 30, 2025, 11:28 amContinuing our effort to further simplify the initial WiFi Setup Process we are releasing Version 5.2 of the app with the following changes:
A. Corrected the following (5.1):
While scrolling through the star list during any of the Alt/Az Star Alignment procedures, the first letter of the Star Name was not changing; it got stuck to the first letter of the first star presented. (Thanks to Bart S. for finding and reporting this bug)
B. Changed the font of the two display lines to monospace (5.1)
C. Added the following enhancements:
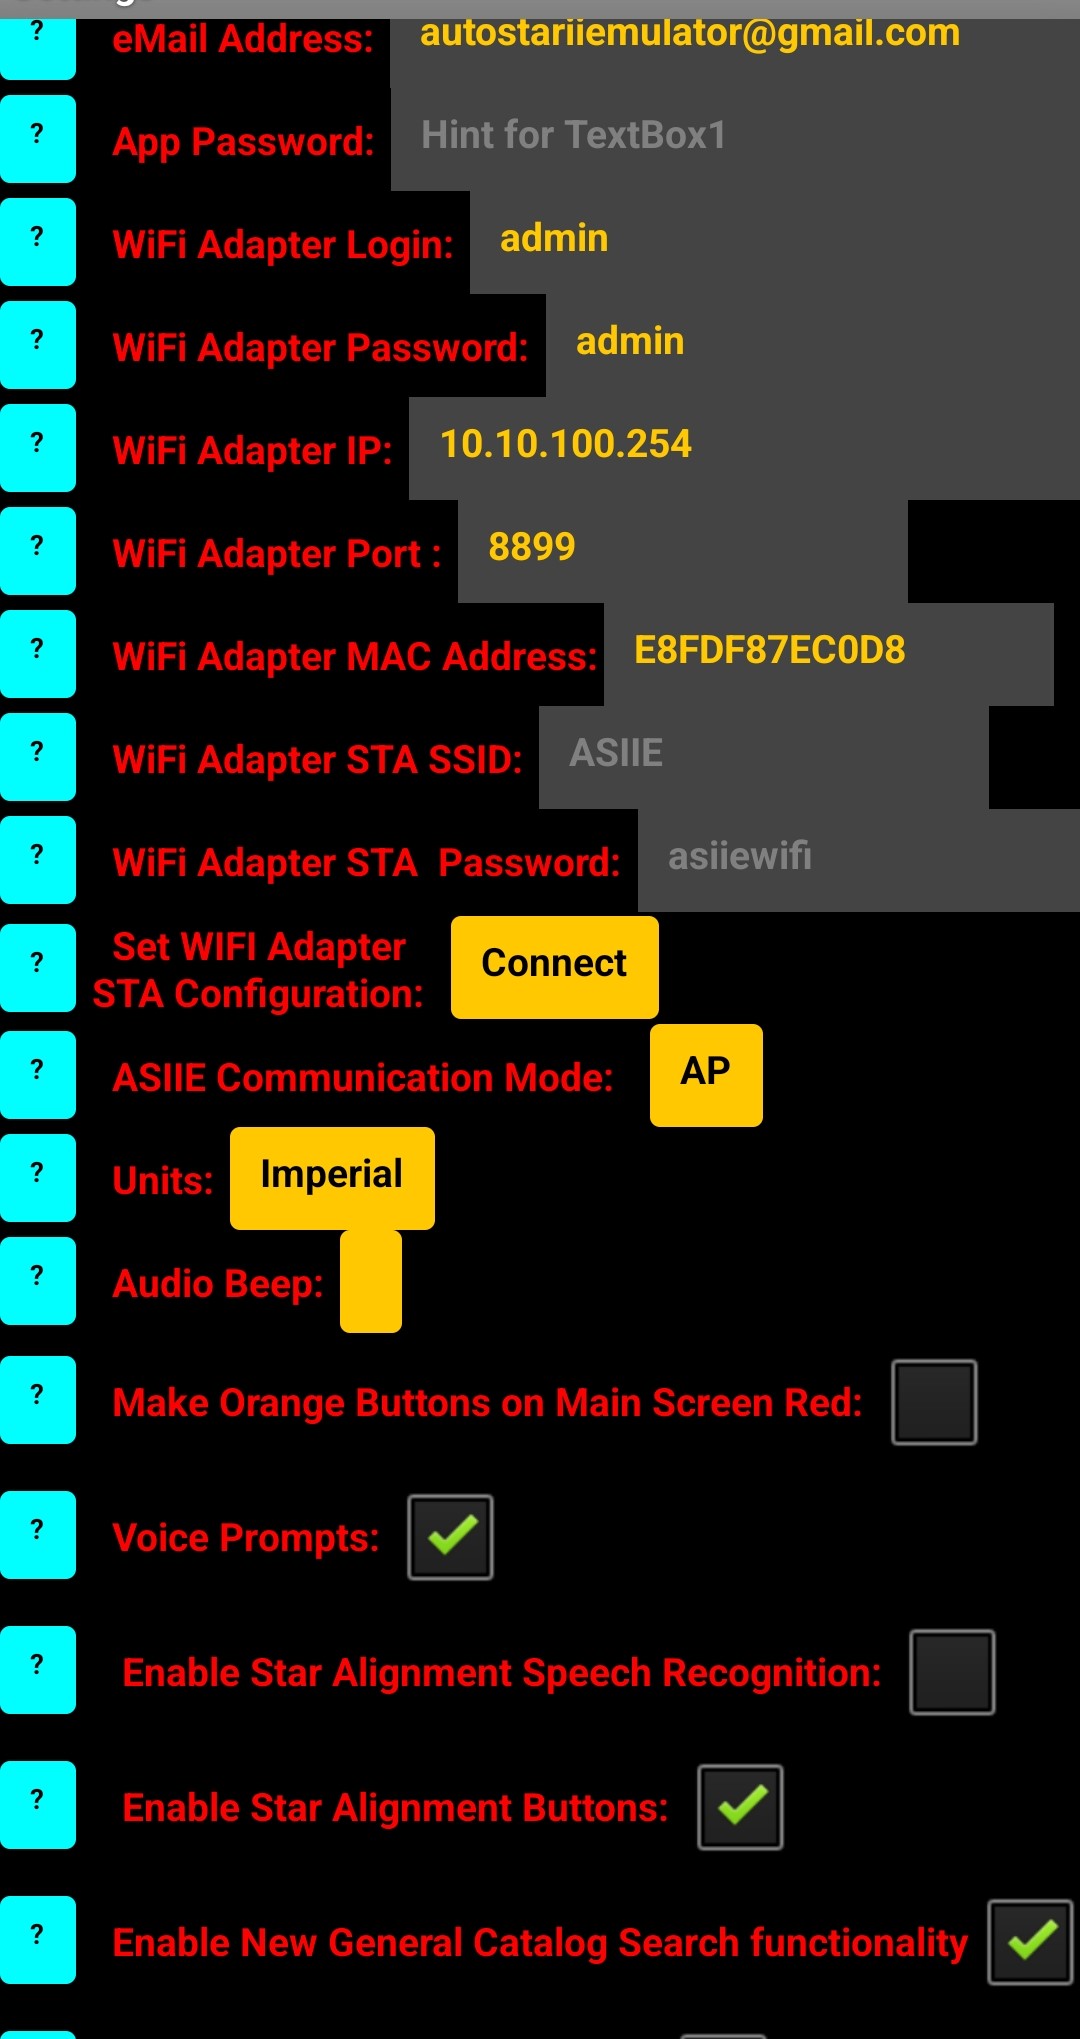
I. Changes/added two fields in the Settings Screen (5.2):
- WiFi Adapter STA SSID: xxxxxxx
- WiFi Adapter STA Password: xxxxxxx
Those two fields can be used to set the WiFi Adapter STA mode credentials for any WiFi Network including Hotspot.
If you want to use the Hot Spot method then set the value as noted:
- WiFi Adapter STA SSID: ASIIE
- WiFi Adapter STA Password: asiiewifi
If you want to connect to your Home WiFi network or any other network:
- WiFi Adapter STA SSID: Home Network SSID
- WiFi Adapter STA Password: Home Network password
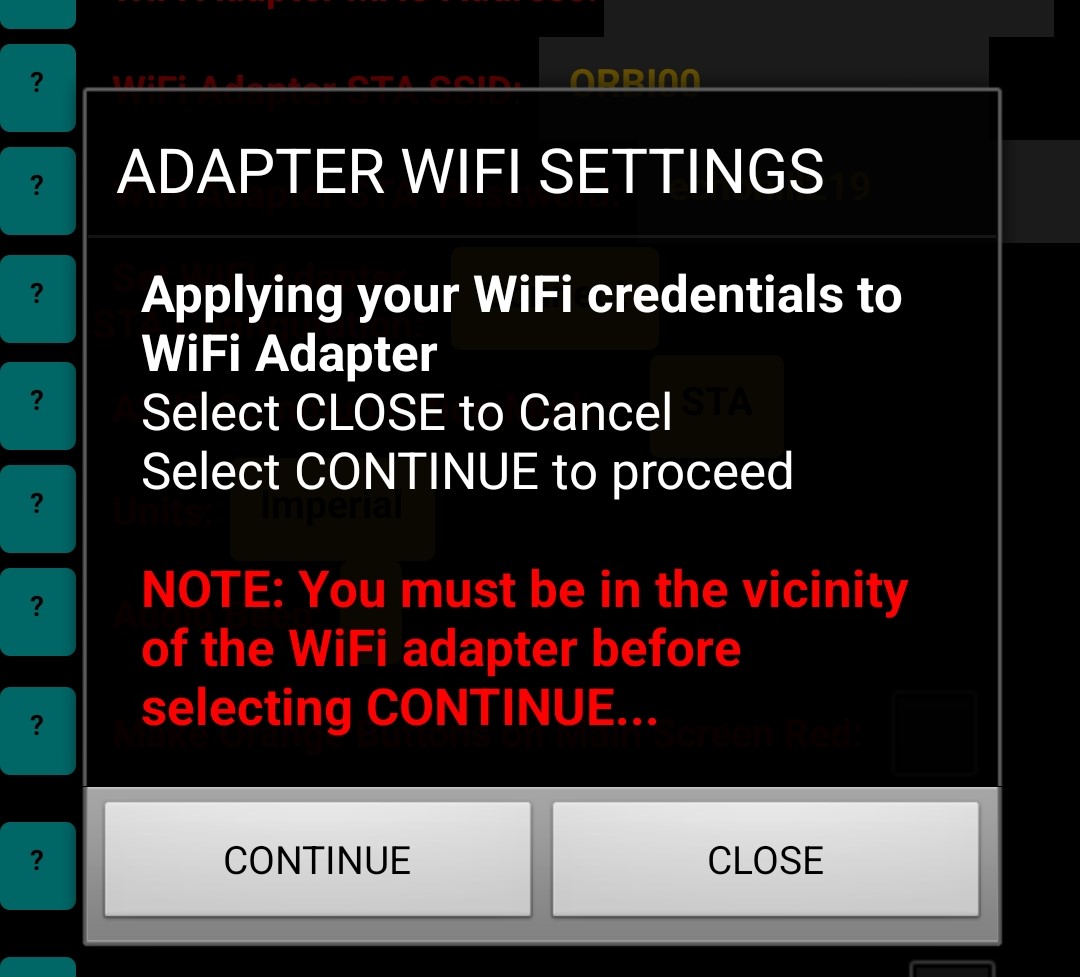
II. A new entry, Set WIFI Adapter STA Configuration: and a Connect button as noted in the image above. Selecting the Connect button, you will be served with a Popup Titled ADAPTER WIFI SETTINGS.
Selecting the CONTINUE button will apply the WiFi Adapter STA credentials by:
- App will open the Android WiFi Settings screen. You will hear a voice prompt with instructions. Waiting around 10 seconds should allow the screen to refresh and present all the networks available. User now should select EW10_XXXX network. Wait until it shows Connected, then select the Left arrow at bottom right of screen to go back to the ASIIE app. You will a hear voice prompt that you can now use the Apply
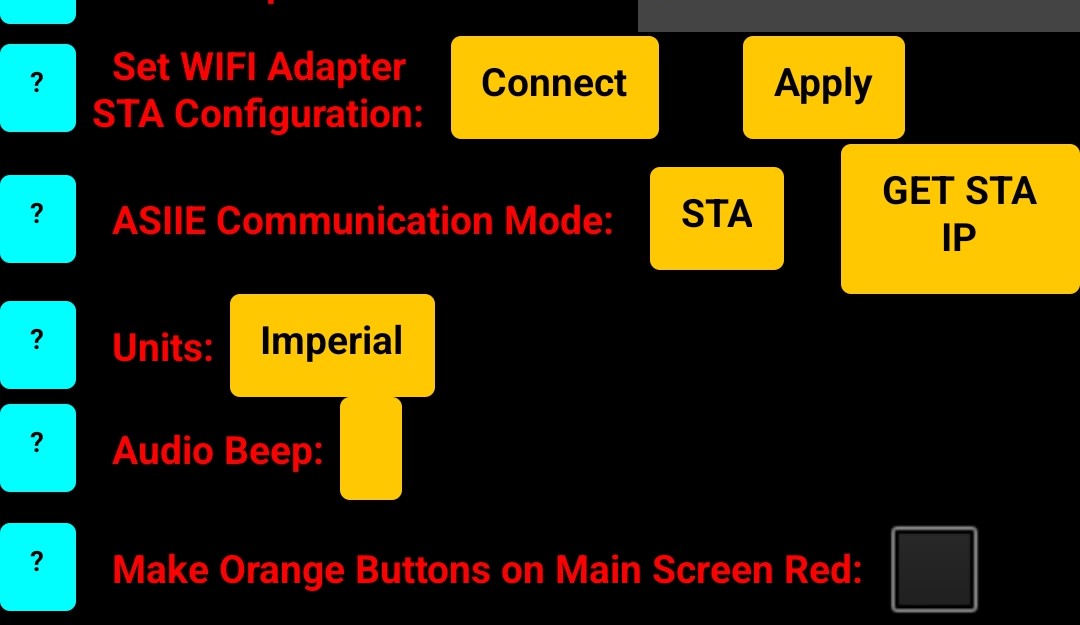
- You will notice a new Apply button to the right of the Connect button.
- Selecting Apply will do the following:
- Logging Into the WiFi Adapter in configuration mode
- Changing the STA SSID and Key
- Saving changes
- Restarting WiFi Adapter so it can connect to the new STA Network
- Disconnecting from WiFi Adapter
- App will open the Android WiFi Settings screen. You will hear a voice prompt with instructions. Waiting around 10 seconds should allow the screen to refresh and present all the networks available. User now should select SSID for the new network. Wait until it shows Connected, then select the Left arrow at bottom right of screen to go back to the ASIIE app.
- App will automatically save changes made in the Settings Screen.
- Now you should use the row labeled ASIIE Communication Mode: and select STA which is covered next.
III. Changed WiFi Adapter Mode entry to ASIIE Communication Mode. Also, changed from ‘AP’, ‘STA Hotspot’, ‘STA WiFi’ (Ver 5.1) back to ‘AP and ‘STA’ (ver 5.2) in the Settings Screen.
- When selecting AP mode, the app will:
- Auto populate the WiFi Adapter IP Address to 10.10.100.254
- Save changes
- Selecting STA mode, you will get a popup titled “STA MODE” explaining this mode. Selecting the CONTINUE button:
- App will open the Android WiFi Settings screen. You will hear a voice prompt with instructions. Waiting around 10 seconds should allow the screen to refresh and present all the networks available. User now should select EW10_XXXX network. Wait until it shows Connected, then select the Left arrow at bottom right of screen to go back to the ASIIE app. You will a hear voice prompt that you can now use the GET STA IP
- Selecting GET STA IP will do the following:
- Getting the STA IP address that was assigned by the new network you joined and populates the WiFi Adapter IP
- Disconnecting from WiFi Adapter
- App will open the Android WiFi Settings screen. You will hear a voice prompt with instructions. User now should select SSID for the new network. Wait until it shows Connected, then select the Left arrow at bottom right of screen to go back to the ASIIE app.
- App will automatically save changes made in the Settings Screen, and you will get a voice prompt stating the you can use the WiFi Connect button on the Main Screen.
Note: You should always be in the proximity of the WiFi Adapter while setting new STA Credentials and Getting STA IP.
IV. Added a new field Enable Star Alignment Buttons (5.1) that when enabled you will get a new button on the Main Screen, STAR ALIGNMENT, when pressed you will get a new popup with BIG SLEW and SCROLL buttons making it easy to use when trying to center the star in the view finder.
V. Added a new field Enable Star Alignment Speech Recognition (5.1) that when enabled you will get a new button on the Main Screen, STAR ALIGNMENT, when pressed you will get a new popup with where you can use voice commands to control some functions of the mount. Basically, you press and hold a button, speak the command. To Slew North, you hold the voice button down speak NORTH, the mount starts slewing at the set speed rate and when you release the voice button it will stop slewing. You also get voice voice prompts of Slewing North and Stop Slewing. Note: you can only have one of the Star Alignment features on.
VI. Added the ability to use a Wireless Backlit Numeric Keypad (5.1) to control the mount. This feature is already in the code and will be turned on to the users who purchase the numeric keypad. Can be toggled on by modifying the user’s Cloud account. Once the User’s Cloud account is configured for the Wireless Backlit keypad, you will get an entry in the Settings screen where you can enable this feature on/off.I need to sort out the logistics first… More information is available on this on autostaremulator.com under:
https://autostaremulator.com/index.php/forum/topic/controlling-your-mount-using-a-wifi-backlit-keypad/VII. Added an automatic process when selecting Connect WiFi button (5.2) in the Main Screen to address an empty Display lines upon power up. This happens mostly upon powering up the telescope which also power up the WiFi adapter. The adapter takes around 6 seconds to go through its bootup process and be ready to communicate. If the telescope had sent some status update in those 6 seconds, the app will show a blank display lines. For past releases, the user was advised to the push the Mode key if the screen was blank to get a response from the telescope and update the Display lines. The new process will send a ScrollUp command which will prompt the telescope to respond followed by a ScrollDown command to bring the Display lines in Sync with the telescope. The user might see a quick flash on the Display lines but most of the time it should not be noticeable. This again only happens when the Use Selects the CONNECT WIFI button.
Continuing our effort to further simplify the initial WiFi Setup Process we are releasing Version 5.2 of the app with the following changes:
A. Corrected the following (5.1):
While scrolling through the star list during any of the Alt/Az Star Alignment procedures, the first letter of the Star Name was not changing; it got stuck to the first letter of the first star presented. (Thanks to Bart S. for finding and reporting this bug)
B. Changed the font of the two display lines to monospace (5.1)
C. Added the following enhancements:
I. Changes/added two fields in the Settings Screen (5.2):
-
- WiFi Adapter STA SSID: xxxxxxx
- WiFi Adapter STA Password: xxxxxxx

Those two fields can be used to set the WiFi Adapter STA mode credentials for any WiFi Network including Hotspot.
If you want to use the Hot Spot method then set the value as noted:
-
-
- WiFi Adapter STA SSID: ASIIE
- WiFi Adapter STA Password: asiiewifi
-
If you want to connect to your Home WiFi network or any other network:
-
-
- WiFi Adapter STA SSID: Home Network SSID
- WiFi Adapter STA Password: Home Network password
-
II. A new entry, Set WIFI Adapter STA Configuration: and a Connect button as noted in the image above. Selecting the Connect button, you will be served with a Popup Titled ADAPTER WIFI SETTINGS.

Selecting the CONTINUE button will apply the WiFi Adapter STA credentials by:
-
- App will open the Android WiFi Settings screen. You will hear a voice prompt with instructions. Waiting around 10 seconds should allow the screen to refresh and present all the networks available. User now should select EW10_XXXX network. Wait until it shows Connected, then select the Left arrow at bottom right of screen to go back to the ASIIE app. You will a hear voice prompt that you can now use the Apply
- You will notice a new Apply button to the right of the Connect button.

- Selecting Apply will do the following:
- Logging Into the WiFi Adapter in configuration mode
- Changing the STA SSID and Key
- Saving changes
- Restarting WiFi Adapter so it can connect to the new STA Network
- Disconnecting from WiFi Adapter
- App will open the Android WiFi Settings screen. You will hear a voice prompt with instructions. Waiting around 10 seconds should allow the screen to refresh and present all the networks available. User now should select SSID for the new network. Wait until it shows Connected, then select the Left arrow at bottom right of screen to go back to the ASIIE app.
- App will automatically save changes made in the Settings Screen.
- Now you should use the row labeled ASIIE Communication Mode: and select STA which is covered next.
- You will notice a new Apply button to the right of the Connect button.
- App will open the Android WiFi Settings screen. You will hear a voice prompt with instructions. Waiting around 10 seconds should allow the screen to refresh and present all the networks available. User now should select EW10_XXXX network. Wait until it shows Connected, then select the Left arrow at bottom right of screen to go back to the ASIIE app. You will a hear voice prompt that you can now use the Apply
III. Changed WiFi Adapter Mode entry to ASIIE Communication Mode. Also, changed from ‘AP’, ‘STA Hotspot’, ‘STA WiFi’ (Ver 5.1) back to ‘AP and ‘STA’ (ver 5.2) in the Settings Screen.
-
- When selecting AP mode, the app will:
- Auto populate the WiFi Adapter IP Address to 10.10.100.254
- Save changes
- Selecting STA mode, you will get a popup titled “STA MODE” explaining this mode. Selecting the CONTINUE button:
- App will open the Android WiFi Settings screen. You will hear a voice prompt with instructions. Waiting around 10 seconds should allow the screen to refresh and present all the networks available. User now should select EW10_XXXX network. Wait until it shows Connected, then select the Left arrow at bottom right of screen to go back to the ASIIE app. You will a hear voice prompt that you can now use the GET STA IP

- Selecting GET STA IP will do the following:
- Getting the STA IP address that was assigned by the new network you joined and populates the WiFi Adapter IP
- Disconnecting from WiFi Adapter
- App will open the Android WiFi Settings screen. You will hear a voice prompt with instructions. User now should select SSID for the new network. Wait until it shows Connected, then select the Left arrow at bottom right of screen to go back to the ASIIE app.
- App will automatically save changes made in the Settings Screen, and you will get a voice prompt stating the you can use the WiFi Connect button on the Main Screen.
- App will open the Android WiFi Settings screen. You will hear a voice prompt with instructions. Waiting around 10 seconds should allow the screen to refresh and present all the networks available. User now should select EW10_XXXX network. Wait until it shows Connected, then select the Left arrow at bottom right of screen to go back to the ASIIE app. You will a hear voice prompt that you can now use the GET STA IP
- When selecting AP mode, the app will:
Note: You should always be in the proximity of the WiFi Adapter while setting new STA Credentials and Getting STA IP.
IV. Added a new field Enable Star Alignment Buttons (5.1) that when enabled you will get a new button on the Main Screen, STAR ALIGNMENT, when pressed you will get a new popup with BIG SLEW and SCROLL buttons making it easy to use when trying to center the star in the view finder.
V. Added a new field Enable Star Alignment Speech Recognition (5.1) that when enabled you will get a new button on the Main Screen, STAR ALIGNMENT, when pressed you will get a new popup with where you can use voice commands to control some functions of the mount. Basically, you press and hold a button, speak the command. To Slew North, you hold the voice button down speak NORTH, the mount starts slewing at the set speed rate and when you release the voice button it will stop slewing. You also get voice voice prompts of Slewing North and Stop Slewing. Note: you can only have one of the Star Alignment features on.
VI. Added the ability to use a Wireless Backlit Numeric Keypad (5.1) to control the mount. This feature is already in the code and will be turned on to the users who purchase the numeric keypad. Can be toggled on by modifying the user’s Cloud account. Once the User’s Cloud account is configured for the Wireless Backlit keypad, you will get an entry in the Settings screen where you can enable this feature on/off.I need to sort out the logistics first… More information is available on this on autostaremulator.com under:
https://autostaremulator.com/index.php/forum/topic/controlling-your-mount-using-a-wifi-backlit-keypad/
VII. Added an automatic process when selecting Connect WiFi button (5.2) in the Main Screen to address an empty Display lines upon power up. This happens mostly upon powering up the telescope which also power up the WiFi adapter. The adapter takes around 6 seconds to go through its bootup process and be ready to communicate. If the telescope had sent some status update in those 6 seconds, the app will show a blank display lines. For past releases, the user was advised to the push the Mode key if the screen was blank to get a response from the telescope and update the Display lines. The new process will send a ScrollUp command which will prompt the telescope to respond followed by a ScrollDown command to bring the Display lines in Sync with the telescope. The user might see a quick flash on the Display lines but most of the time it should not be noticeable. This again only happens when the Use Selects the CONNECT WIFI button.


